|
|
■DIY Renovation
Sample Collection
■Take a look at
the all processes of
our DIY renovations! |
We, the members of "Igokochi.com" do love beautiful interiors,
beautiful living spaces.
We made a decision of creating our own living spaces by ourselves. Yes,
we have done it ourselves.
It was not so easy job, but the feeling of these creative activities were
unforgettable.
We do want to share this joy and the satisfaction of DIY renovations with
you!
Why don't you join us and start your own do-it-yourself project? |
|
|
|
|
| Before renovation. Two small Japanese tatamimat rooms |
 |
 |
| Pierce saw onto the wall |
 |
| Messy floor during demolishing work |
 |
| Achieve a flat floor between tatami room and living |
 |
| After completion, view to bookshelf side |
 |
|
The flat had a typical Japanese style floor plan with 2 tatami rooms next
to living. We planed to demolish walls and make it one livingroom space.
1: Examining inside wall structure.
Check the structure of the partition wall. If it is made of wood and plaster board, it doesn't count on building structure of the flat. If you want to renovate wooden structure house, you need to see a builder to check with that.
Our flat case was OK with simple plasterboard structure.The wall .
The problem was difference of floor level elevations. We took off Tatami mats and found urethene form panels underneath.
2: Figure out completion image.
Just raise image sketch of detail finish and furniture arrangement. The
actual measurement of the room size helps this image work. You will see
what is possible and impossible. Parth drawing would be a great help to
boost motivation.
3: Demolishing of the walls
Removing furniture, then let's smash the wall! Plasterboard is not a tough material, so it is easy to break and get rid of this wall with small knife-shaped saw within 3 hours.
Pay attention not to damage the electric wiring inside the walls. Ask professional to the electrical work..
4: Removal of demolition debris
Even rather small space renovation, we need to arrange disposal of big
amount of demolition debris.
It is essential to dispose debris according to the local rules.
5: Flat the uneven floor levels.
Two tatami rooms and the livingroom had different floor levels. So we flat the levels by moving tatami mats and using plywood.
|
| 02: Let's make the wall bookshelf. |
| We built a whole wall covered bookshelf |

|
| After End of the livingroom, bookshelf for large size books |

|
| Two road racer bikes on the bookshelf wall |
|
|
We planed open-bookshelf for our book collection.
1: Decide the size of bookshelf fit with book collection.
The interval of a shelf board is about
roughly 240 mm.
2: Purchase shelf boards at DIY home center.
(23mm in thickness 190mm in width)
Order to cut boards precise sizes.
3: Paint boards with dark brown.
4: Build up frame materials.
5: Screw with power tool to get holes for wood pegs.
6: Place wood sheds.
7: Fix bookshelves to the wall by using long wood screw.
|
| 03: Arrange the beams on the ceiling. |
| Placing 2×4 wood for supporting beams |

|
| A Replica beam is easy to cut. |

|

|
| Temporary placing replica beam on the ceiling |

|
| Curing is essential |
 |

|
| After all, it finished! |

|
|
Exposed beams are popular in European period houses such as old farm cottages in the country also in the old town area in Paris or in Rome.
We were fascinated by such exposed beam cottage interior. Then, we just
tried.
We utilized French-made good looking replica beams. They are light and
safe to build.
1: Planning and material choice
There are many styles of exposed beam arrangement. We selected British cottage style. We selected French replica beam for our ceiling.
This material is utilized for the restoration of European chateau.
2: Build up foundation
The core structure for the beams is necessary for putting beams on the ceiling. We used 2 * 4 materials and lots of long screws to fix them on the ceiling
3: Cutting the replica beam
This replica beam is made of urethane form, it is incredibly light and
easy to cut.
4: Side beams temporally set on the ceiling
Sub beams are arranged like the left picture.
Then, glued to the ceiling.
5: Use urethane boards for filing up side gaps
WE used urethane boards for filing up side gaps. This process is necessary for plaster works.
6: Curing
Curing for plaster is the important process. We utilized newspaper, plastics,
packing tapes, etc. It is care of the trial and error such as the vinyl
and newspaper. However, we had stains of the replica beams!
Later, I used touch-up paint for conceal these marks.
I found that pre-cure is so important.
7: Plaster paint
Plastering on the ceiling is not easy work. We did it using a trowel. At
last, hand plastered ceiling came up..
|
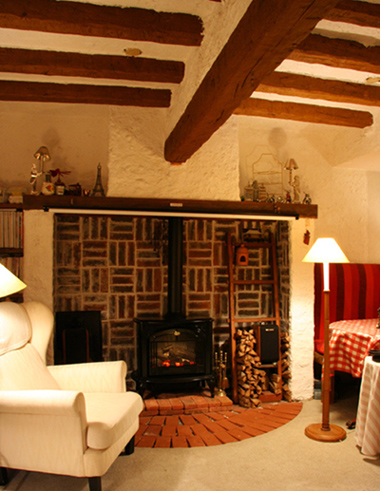
| 04: Let's make a fireplace |
| Putting bricks as basement |
 |
| Fireplace frame by 2 * 4 and plywood |
 |
| Ceramic brick plates were arranged on the wall |
  |
| Before chimney is made |
 |
| After chimney is made |
 |
| Present fireplace surroundings |
 |
|
We wanted to make a large size inglenook fireplace. However, this living room is relatively small, we made this fireplace with a shallow depth..
1: Foundation
We paved bricks as foundation of the inglenook fireplace with semicircle
shape.
2: Fireplace frame by 2 * 4 and plywood.
Real inglenook fireplace should be structured by filling stones or bricks. However, we made this structure by plywood and 2 * 4 frames, plastered on surface.
3: Putting the ceramic brick plates
We covered inside of fireplace with ceramic brick plates. Advantage of
this plates, of cause, its lightness and easy installation. We lined horizontal
guide by pencil directly on the wall. And we pasted plates on the wall.
We filled brick joint with mortar.
4: Construct the chimney part
Fireplace does not function without chimney. So we built a fake chimney
on the top!
5: Placing an Canadian electric wood stove.
We put an electric wood stove in the inglenook. Although this is electric stove, the frame is so real and outlook is very close to that of cast iron.
We bought real stove wood for display and stacked them beside of the stove.
|
| 06: Kicking out a tube TV from the livingroom |
Southern French style, Asian resort style, New Yorkers' loft style, after
you spare effort to achieve nice interior, big tube TVs can destroy the
atmosphere of your nice rooms easily. Of cause, kicking out big TV sets
should be the best solution. But,. we need TV news show every day. We found
a solution for this dilemma. Let's kick out big TV and place high-definishion
projector.
|
|
|